1. Understanding of the default configuration of PhpMyAdmin. By default (within Ubuntu 16.04) PhpMyAdmin is included (and enabled) into the Apache's configuration (for all VirtualHosts!) through this additional configuration file:
/etc/apache2/conf-enabled/phpmyadmin.conf
This file is a symbolic link to the file
/etc/apache2/conf-available/phpmyadmin.conf, which is a symbolic link to the file /etc/phpmyadmin/apache.conf, which will be used in the next step.
2. Create new VirtualHost configuration file. Let's call it
phpmyadmin.conf and create it by nano(or you can use your favorite text editor):sudo nano /etc/apache2/sites-available/phpmyadmin.conf
The content of this file should looks like:
Listen 99


        ServerName localhost


                AllowOverride None
                Require all granted


        DocumentRoot /usr/share/phpmyadmin

        Include /etc/phpmyadmin/apache.conf

        ErrorLog ${APACHE_LOG_DIR}/phpmyadmin.error.log
        CustomLog ${APACHE_LOG_DIR}/phpmyadmin.access.log combined
Where:
ServerName localhostthis directive is optional and can be customised according to your needs. (Usually there haveServerNameset on the Server level - in/etc/apache2/apache2.conf);... /usr/share/are usually set in/etc/apache2/apache2.conf. But you can add specific rules here, for example you canSet Up Password Authentication;DocumentRoot /usr/share/phpmyadminthis directive sets/usr/share/phpmyadminas directory that forms the main document tree visible from the web, for the current VirtualHost;Include /etc/phpmyadmin/apache.confthis directive includes the default phpMyAdmin's configuration into Apache's configuration. Thus/etc/phpmyadmin/apache.confwill be included only for the current VirtualHost! Instead of this directive you can copy/paste the content of/etc/phpmyadmin/apache.confin this place.
3. Switch Apache's configuration and restart it.
sudo a2disconf phpmyadmin
sudo a2ensite phpmyadmin
sudo systemctl restart apache2.service
Where:
a2disconf phpmyadminwill disable the default phpMyAdmin's configuration, described in 1.a2ensite phpmyadminwill enable the new VirtualHost, described in 2.
!!. Edit
/etc/phpmyadmin/apache.conf and comment (#) the first Alias directive like thath:#Alias /phpmyadmin /usr/share/phpmyadmin
This step is optional, but otherwise
http://localhost:99 and http://localhost:99/phpmyadmin will provide identical result, so I suppose we do not need that :)
!!. If you want this new VirtualHost to be accessible from the outside don't forget to add port
99 into your firewall's rules. If you use UFW you can do that by this command:sudo ufw allow 99/tcp
With iptables you can do that by this command:
sudo iptables -A INPUT -p tcp -m tcp --dport 99 -j ACCEPT
add a comment
4
Adding access via port 99 is quick and easy
Add the port 99 to your Apache2 configuration. Edit
/etc/apache2/ports.conf. Add the directive Listen 99:# If you just change the port or add more ports here, you will likely also # have to change the VirtualHost statement in # /etc/apache2/sites-enabled/000-default.conf Listen 80 Listen 99Listen 443 Listen 443 # vim: syntax=apache ts=4 sw=4 sts=4 sr noet
This adds port 99 to the available access. To disable port 80 where you can only have access via port 99, comment out or remove the
Listen 80 from the configuration.
Disabling the default port is a little more detailed
In most circumstance, disabling the default port 80 isn't necessary.
If you have other sites that you need to have access to port 80 and the
Listen directive to that Virtualhost.
Alternatively, you could restrict Phpmyadmin to only one specific port by creating a Phpmyadminversion host and use the Listen 99 directive to that virtual host.
Details for creating a virtual host for Apache2 can be found here:
Make a symbolic link to
https://www.tecmint.com/change-secure-phpmyadmin-login-url-page/

/usr/share/phpmyadmin the virtualhost document root.https://www.tecmint.com/change-secure-phpmyadmin-login-url-page/
By default, the login page of phpmyadmin is located at
http:///phpmyadmin . The first thing that you will want to do is changing that URL. This will not necessarily stop attackers from targeting your server, but will lower the risks of a successful break-in.
This is known as security through obscurity and while some people would argue that it is not a safe measure, it has been known to both discourage attackers and to prevent break-ins.
Note: Make sure you have working LAMP or LEMP setup with PhpMyAdmin installed on your system, if not, then follow Setup LAMP or LEMP with PhpMyAdmin.
To do it in Apache or Nginx Web servers, follow the instructions as explained below:
Change PhpMyAdmin Login Page in Apache
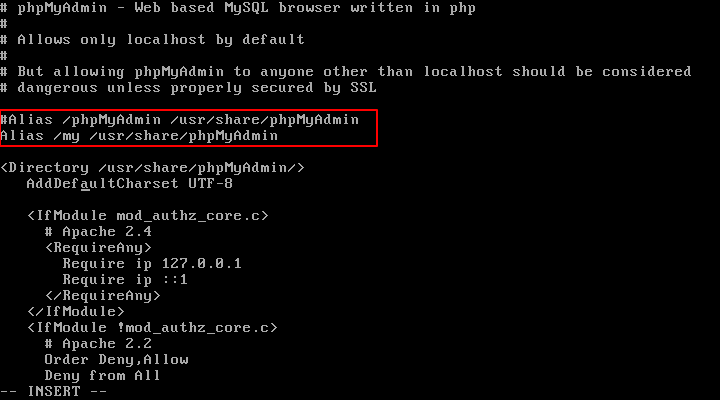
open /etc/httpd/conf.d/phpMyAdmin.conf if in CentOS or /etc/phpmyadmin/apache.conf in Debian and comment out the line(s) beginning with Alias.
Then add a new one as follows:
PhpMyAdmin Change Alias
The above will allow us to access the phpmyadmin interface via
http:///my . Feel free to change the Alias above if you want to use another URL.
In the same file, make sure the Require all granted directive is included inside the Directory
/usr/share/phpmyadmin block.
PhpMyAdmin Allow Access
In addition, make sure Apache reads the phpmyadmin configuration in Debian/Ubuntu:
Finally, restart Apache to apply changes and point your browser to
http:///my .Change PhpMyAdmin Login Page in Nginx
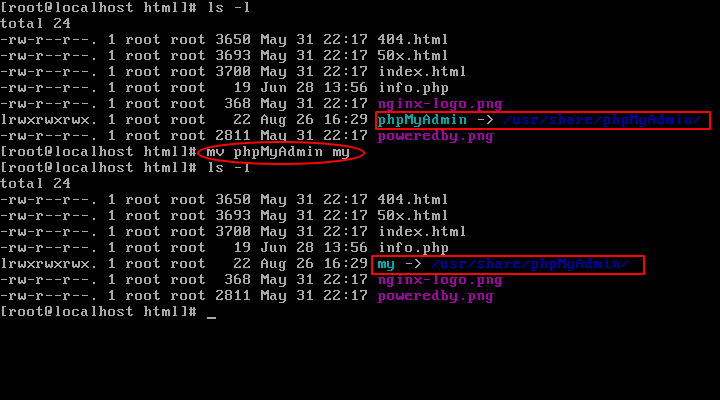
On the Nginx web server, we just need to create a symbolic link of PhpMyAdmin installation files to our Nginx document root directory (i.e. /usr/share/nginx/html) by typing the following command:
Now we need to change the URL of our phpMyAdmin page, we simply need to rename the symbolic link as shown:
Change PhpMyAdmin Url in Nginx
Finally, restart Nginx and PHP-FPM to apply changes and point your browser to
http:///my .
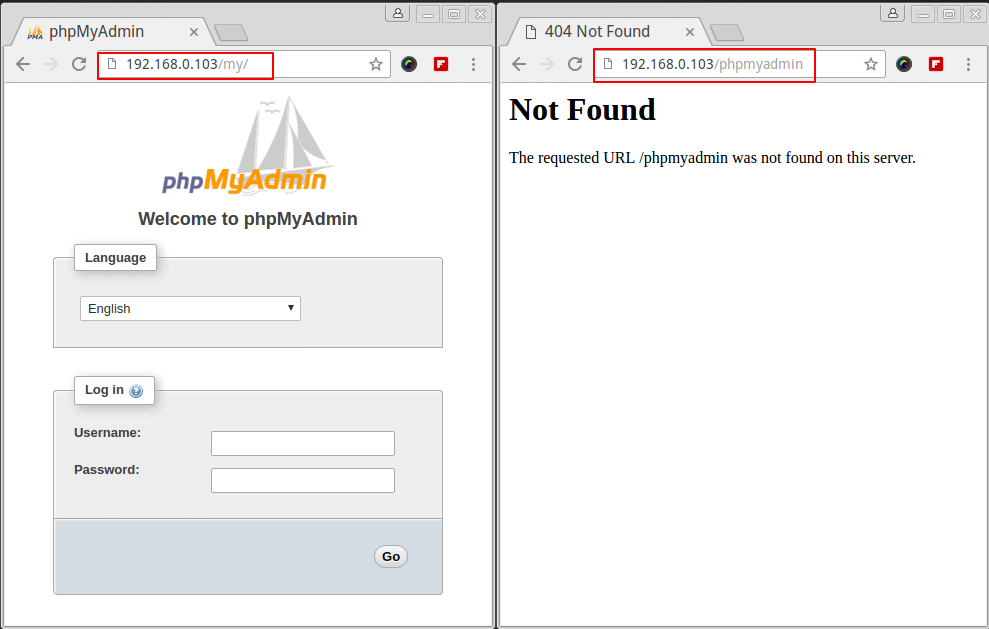
It should open the phpmyadmin interface (as shown in the image below), whereas
http:///phpmyadmin should result in a Not Found error page.
Secure PhpMyAdmin Login Page
Do not login using the database root user’s credentials yet. You don’t want those credentials going through the wire in plain text, so in the next tip we will explain how to setup a self-signed certificate for PhpMyAdmin login page.
ไม่มีความคิดเห็น:
แสดงความคิดเห็น