วันจันทร์ที่ 20 กรกฎาคม พ.ศ. 2563

ติดตั้ง mikrotik

การติดตั้ง Mikrotik OS 5.26 แบบ CD + Crack ฉบับรวบรัด

ติดตั้ง mikrotik
download mtOS v.5.26 : https://mikrotik.com/download
crack mtOS : HunterTik-v2.3.1.1
ขั้นตอนวิธี เตรียมไฟล์สำหรับติดตั้ง
1.เบิร์นไฟล์ Mikrotik OS 5.26 ที่โหลดมาใส่แผ่นซีดีด้วยโปรแกรม nero
2. เบิร์นไฟล์ HunterTik .ใส่แผ่นซีดี เช่นกัน

ติดตั้ง

1.ใส่แผ่น CD Mikrotik OS 5.26 เข้าไปแล้วตั้ง bios ให้บูตจาก CD เมื่อบูทเสร็จ จะได้ดังรูป

2.เมื่อบูตเข้ามาหน้านี้ ให้กด a > i > n > y  แล้วกด Enter
“a” = all สำหรับ เลือกรายการ Package ทั้งหมด หรือ ที่ต้องการ
“i” = install สำหรับ ติดตั้ง Package ทั้งหมด (ตามที่เลือกไว้)
"n" = ระบจะถามว่าให้คงค่าเดิมที่คอนฟิกไหม หรือไม่ ให้กด n
“y” = ยืนยันการ ติดตั้ง Package ของ Mikrotik ทั้งหมด ดังรูป


3.จากนั้นระบบจะทำการติดตั้ง Package ของ Mikrotik ทั้งหมดให้ โดยเมื่อติดตั้งเสร็จระบบ จะให้กดรีบูท 1 รอบ


4. เมื่อรีบูทเสร็จระบบจะ ถามว่าให้เช็คดิสก์หรือไม่ ให้ตอบว่า n ดังรูป


 5. จากนั้นให้ กดล็อกอินเข้าสู่ Mikrotik  ด้วย user : Admin  password: .ให้กด enter ไปได้เลย ซึ่งตอนเข้าสู่ระบบจะเห็นได้ว่า OS ตัวนี้จะแจ้งว่าให้เราทดลองใช้ได้แค่ 1 วันเท่านั้น 


6.ซึ่งเมื่อเข้าสู่ระบบจะเห็นได้ว่า OS ตัวนี้จะแจ้งว่าให้เราทดลองใช้ได้แค่ 1 วันเท่านั้น จำเป็นต้องมีคีย์ในการซื้อสิทธิ์ในการเข้าใช้งาน  ดังรูป


เมื่อติดตั้งMikrotikOS 5.26 x86 เสร็จแล้วต่อไปจะเป็นการ Crack สิทธิ์ในการเข้าใช้งาน Mikrotik ด้วยโปรแกรม  Huntertik 2.3.1.1 โดยถ้าเตรียมไฟล์อิมเมจไว้แล้วต่อไปก็เริ่มการ Crack  โดยมีขั้นตอนดังนี้

1.ใส่แผ่น Huntertik 2.3.1.1 แล้วก็ตั้ง Bios ให้บูตจาก CD โดยจะปรากฎหน้าบูทดังรูป


2.เมื่อบูทสำเร็จ ระบบจะให้ ติดตั้งซอฟแวร์ ให้กด Enter 


3.เลือก INSTALL HunterTik and/or MicroTik license patch
แล้วกด Enter


4.ในหน้า complement ให้กด enter


  5. หน้านี้ เหมือนเป็นการให้เรายอมรับข้อตกลง ให้เลือก Yes แล้วกด enter

            
6.จากนั้นให้รอสักครู่ในระหว่างที่ระบบทำการติดตั้ง


7.เมื่อติดตั้งเสร็จ ระบบจะให้เลือก ภูมิภาค ให้เลือก Asia แล้วกด enter


8.ระบบให้เลืองเมือง เลือก bangkok แล้วกด Eenter

9.ให้ตั้งรหัสผ่าน root (ตั้งอะไรแล้วแต่ท่าน)

10.ยืนยันรหัสผ่าน root


11.เมื่อตั้งค่าเสร็จ ระบบจะให้ยอมรับข้อตกลงหรืออะไรสักอย่าง ให้เรากด yes แล้วกด enter


12.จากนั้นระบบจะให้ติดตั้ง bios patch และคีย์สำหรับ Crack


13.จากนั้นให้เลือก รีบูทเครื่อง เป็นอันว่าเสร็จสิ้นในการ crack


  • เมื่อเราติดตั้ง MikrotikOS เสร็จสิ้น สามารถใช้โปรแกรม winbox เพื่อรีโมด ไปใช้งานได้สะดวกยิ่งขึ้นโดย การจะรีโมดผ่านการเชื่อมต่อ MAC Address โดยเชื่อมผ่านระบบสาย lan ขานึงอยู่ที่เครื่อง Mikrotik อีก ขาหนึ่งเชื่อมไปยังเครื่องที่ติดตั้ง winbox โดยใช้ user และ pass เดียวกันกับที่เข้า Mikrotik ดังรูป


ที่มา : https://xn--72cah1cr9b4d8bc5nncf.blogspot.com/2015/08/mikrotik-os-526.html

วันพุธที่ 3 มิถุนายน พ.ศ. 2563

rb450 not boot

งานเข้าล่าสุดครับ

เนื่องจากตอน Update Package แล้วไฟดับ ทำให้ Logon ผ่าน Winbox ไม่ได้เลย ปกติแล้วพอ Boot เครื่องจะต้องมีเสียง Beep อยู่ 2 ครั้ง แต่คราวนี้ดัง Beep ครั้งเดียว แล้วก็นิ่ง กดปุ่ม Reset ก็ไม่ได้ผล


มีทางแก้ครับ

1. Download โปรแกรม NetInstall ที่ Web นี้ครับ http://www.mikrotik.com/download.html


2. Fix IP ให้กับเครื่อง Computer ตามหัวข้อ การ Fix IP ให้กับเครื่อง Computer เพื่อเชื่อมต่อกับ Access Point


3. จากนั้น Run โปรแกรม NetInstall ขึ้นมา Click ปุ่ม [Net booting]


4. ใส่หมายเลข Client IP Address: ให้ตรงกับ IP Class ที่เราใช้ครับ


5. เชื่อมต่อสาย Serial Port (สาย Null Modem) เข้ากับ Mikrotik RB450G ครับ


6. เปิดโปรแกรม Hyperterminal ถ้าไม่มี Download ได้ที่นี้ครับ Hyperterminal


7. เลือก Comport แล้ว Click [OK]


8. กำหนด BaudRate ตามรูปเลยครับ จากนั้น Click [OK]


9. ทีนี้ปิด/เปิด RouterBoard ครับ


10. ในหน้าจอ Hyperterminal จะแสดงตามรูปครับ รีบเคาะ Enter ใน 2 วินาที
ถ้าทันจะมี Menu ขึ้นมา ให้กด o (โอ) เลือก boot device


11. แล้วกด 1 เพื่อเลือก Boot จาก Ethernet


12. จากนั้นกด x เพื่อออกครับ


13. จะขึ้นหน้าจอรอ Install


14. ที่หน้าจอโปรแกรม NetInstall จะมีชื่อ Router ขึ้นมาให้ Click เลือก และ Click [Browse] เพื่อเลือก Folder ที่เก็บ Package และเลือก Package ที่ต้องการติดตั้งครับ


15. เมื่อเลือก Package แล้ว Click ปุ่ม Install


16. พอ Install เสร็จปุ่ม Install จะเปลี่ยนเป็น Reboot ให้ Click [Reboot]


เรียบร้อยครับ ;D ;D

วันอังคารที่ 2 มิถุนายน พ.ศ. 2563

raspberry pi phpmixbill


#Apche
sudo apt-get update
sudo apt-get install apache2 -y

ติดตั้งเสร็จแล้วลองเปิด Browser ดู http://localhost หรือ http://your_ip_address จะขึ้นแบบนี้


apache2 -v

#PHP
sudo apt-get install php

php -v


#mysql


sudo apt-get update


sudo apt-get install mariadb-server mariadb-client -y


#phpmyadmin

sudo apt-get install phpmyadmin -y


#phpMyAdmin Login Error

vim /etc/phpmyadmin/config.inc.php

// $cfg['Servers'][$i]['AllowNoPassword'] = TRUE;


First, you copy the /etc/mysql/mysql.conf.d/mysqld.cnf file and past in to /etc/mysql/my.cnf.
You can do it by command:
sudo cp /etc/mysql/mysql.conf.d/mysqld.cnf /etc/mysql/my.cnf
Now let's Rest the password:
Use the following commands in your terminal:
sudo service mysql stop 
sudo service mysql start
sudo mysql -u root
Now you are inside the mysql console.
Then let's write some queries to reset our root password
USE mysql
update mysql.user set authentication_string=password('newpass') where user='root' and Host ='localhost';
update user set plugin="mysql_native_password"; 
flush privileges;
quit
Now we can clean /etc/mysql/my.cng
Open the above file in your editor and remove the whole lines inside the file.
After that let's restart mysql:
sudo mysql service restart 
Now let's use mysql with newly created password:
sudo mysql -u root -p
Finally enter your newly created password.


phpmix chmod 777

/system
/ui/compiled


You can try to update php pear2 netrouterOS https://github.com/pear2/Net_RouterOS to folder system/PEAR2   


on google dirve

If you want to do this FROM the RouterOS, then you can use fetch to send a simple GET request to the specified web page:
/tool fetch url="www.domain.com/url.php?id=2" keep-result=no


/tool fetch url="https://hotspot.mk.com/system/cron.php" keep-result=no


#cornJob MK


วันอาทิตย์ที่ 31 พฤษภาคม พ.ศ. 2563

Raspberry Pi 2 php5.6

If you have a Raspberry Pi 2 you will be have PHP 5.4 installed.
If you want to upgrade to PHP 5.6 or whatever is the latest version, you will have to download the source files, and compile the application.
This is not as difficult as it may sound.
In your Raspberry Pi SSH Terminal:
# Check the PHP version using the following command
php -v
# Get the PHP source
# First find the latest version number from the PHP download page: http://php.net/downloads.php
# Download the latest version either by downloading to your PC and then using ftp to save it back to the Raspberry Pi
# wget http://uk1.php.net/distributions/php-5.6.14.tar.bz2
# where 'uk1.php.net' is your to your nearest mirror. Find the mirror list here: http://php.net/mirrors.php.
# Once on the Raspberry Pi (the location does not really matter as you will delete the source files anyway) unpack using:
tar -xvjf php-5.6.14.tar.bz2
# Change directory to the source folder
cd php-5.6.14
# Find any updates
sudo apt-get update
# Get and install libxml2-dev which is a library that is used to manipulate xml files
sudo apt-get install libxml2-dev
# Do a configure
./configure
# If on the Raspberry Pi 2
make -j4
# Otherwise
make
# The process of compiling does take a long time on a Raspberry Pi - at least an hour for me.
# Install the application
sudo make install
# Reboot to make sure changes are effective
sudo shutdown - r now
# Check PHP version
php -v

# Delete the downloaded source files

วันพุธที่ 18 มีนาคม พ.ศ. 2563

์node JS to 443

ocation / {
          proxy_pass http://localhost:3000;
          proxy_http_version 1.1;
          proxy_set_header Upgrade $http_upgrade;
          proxy_set_header Connection 'upgrade';
          proxy_set_header Host $host;
          proxy_cache_bypass $http_upgrade;

    }


cd /home/admin/conf/web/
nano domain.nginx.ssl.conf
nano domain.nginx.conf

วันพุธที่ 12 กุมภาพันธ์ พ.ศ. 2563

ประโยชน์จาก LINEBOT และ Google Apps Script

ใช้ประโยชน์จาก LINEBOT

ประโยชน์จาก LINEBOT และ Google Apps Script

ให้ Linebot ตอบคำถามแก้ไขปัญหาเบื้องต้น พร้อมบันทึก LogUserID ลดงานฝ่าย Support ลงได้
1.) เตรียมข้อมูลใน Sheet ( Faq ) พร้อมคำตอบลงในแผ่นงาน


2.) เตรียมข้อมูลใน Sheet ( Maybe ) พร้อมคำตอบลงในแผ่นงาน

3.) เตรียมแผ่นงาน ( LogUserID ) เพื่อใช้สำหรับบันทึกข้อมูลการใช้งานผู้ใช้ Line

4.) เมื่อเตรียมข้อมูลแล้วไปที่ "เครื่องมือ" เลือก "<>โปรแกรมแก้ไขสคริปต์"

5.) Copy Code ด้านล่างโดยแก้ไข Token และ Sheet เป็นของตัวเอง


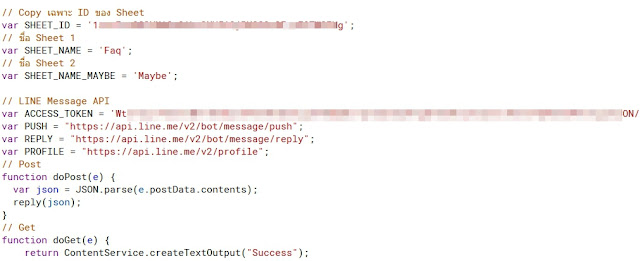
// Copy เฉพาะ ID ของ Sheet
var SHEET_ID = 'ID Sheet';
// ชื่อ Sheet 1
var SHEET_NAME = 'Faq';
// ชื่อ Sheet 2
var SHEET_NAME_MAYBE = 'Maybe';

// LINE Message API
var ACCESS_TOKEN = 'Token';
var PUSH = "https://api.line.me/v2/bot/message/push";
var REPLY = "https://api.line.me/v2/bot/message/reply";
var PROFILE = "https://api.line.me/v2/profile";
// Post
function doPost(e) {
  var json = JSON.parse(e.postData.contents);
  reply(json);
}
// Get
function doGet(e) {
    return ContentService.createTextOutput("Success");
}
// Reply
function reply(data) {
  var lineUserId = data.events[0].source.userId;
  var postMsg    = data.events[0].message.text;
  var replyToken = data.events[0].replyToken;
  var action    = data.events[0].message.action;
  // บันทึกคำค้นหาและ userId สำหรับการบันทึก
  // debug(postMsg, lineUserId);
  debug(action, lineUserId);
  // ค้นหาคำตอบสำหรับคำค้นหาจาก Sheet
  var answers = findResponseArray(postMsg);
  // สร้างข้อความคำตอบ
  var replyText = '「' + postMsg + '」นี่คือคำแนะนำ ลองทำตามดูก่อน';
  // คำถาม ขึ้นอยู่กับมีหรือไม่มีคำตอบ
  if (answers.length === 0) {
    // ตรวจสอบ "คำค้นหาที่คล้ายกัน"
    var mayBeWord = findMaybe(postMsg);
    if (typeof mayBeWord === "undefined") {
      // แก้ไข คำถาม / ปัญหาที่อยากหา เมื่อไม่มีคำตอบ
      sendMessage(replyToken, 'ไม่พบคำถามที่อยู่ในระบบ ลองถามคำถามใหม่');      
    } else {
      sendMayBe(replyToken, mayBeWord);
    }
  } else {
    // การสร้างข้อความเมื่อมีคำตอบ
    answers.forEach(function(answer) {
      replyText = replyText + "\n\n==↓↓==\n\nปัญหา:" + answer.key + "\n\nการแก้ไข:" + answer.value;
    });

    // ตัดคำหากเกิน 500 ตัวอักษร
    if (replyText.length > 500) {
      replyText = replyText.slice(0,500) + "……\n\n==↓↓==\n\nคำถามนั้นมากกว่าจำนวนตัวอักษรที่กำหนด โปรด จำกัด รายละเอียดคำค้นหาให้แคบลง";
    }
    // การส่งข้อความ API
    sendMessage(replyToken, replyText);
  }
}

// รับข้อมูลจาก Sheet 1
function getData() {
  var sheet = SpreadsheetApp.openById(SHEET_ID).getSheetByName(SHEET_NAME);
  var data = sheet.getDataRange().getValues();
  return data.map(function(row) { return {key: row[0], value: row[1], type: row[2]}; });
}

// รับข้อมูลจาก Sheet 2
function getMayBeData() {
  var sheet = SpreadsheetApp.openById(SHEET_ID).getSheetByName(SHEET_NAME_MAYBE);
  var data = sheet.getDataRange().getValues();
  return data.map(function(row) { return {key: row[0], value: row[1], type: row[2]}; });
}

// ส่งคืนอาร์เรย์ของคำตอบสำหรับเซลล์ที่มีคำที่ตรงกัน
function findResponseArray(word) {
  // พื้นที่การค้นหา
  word = word.replace(' ',' ');
  // แบ่งออกเป็นอาร์เรย์สำหรับแต่ละคำ
  var wordArray = word.split(' ');
  return getData().reduce(function(memo, row) {
    // ไม่ว่าจะเป็นค่ารวม
    if (row.value) {
      // และไม่ว่าจะเป็นคำทั้งหมดจะรวมอยู่ในการค้นหา
      var matchCnt = 0;
      wordArray.forEach(function(wordUnit) {
        // ถ้ามีคำตอบที่ถูกต้อง
        if (row.key.indexOf(wordUnit) > -1) {
          matchCnt = matchCnt + 1;
        }
      });
      if (wordArray.length === matchCnt) {
        memo.push(row);
      }
    }
    return memo;
  }, []) || [];
}

// ส่งคืนคำตอบ "บางครั้ง" ของเซลล์ที่จับคู่คำ
function findMaybe(word) {
  return getMayBeData().reduce(function(memo, row) { return memo || (row.key === word && row.value); }, false) || undefined;
}

// การส่ง API ในรูปแบบภาพ
function sendMessageImage(replyToken, imageUrl) {
  var postData = {
    "replyToken" : replyToken,
    "messages" : [
      {
        "type": "image",
        "originalContentUrl": imageUrl
      }
    ]
  };
  return postMessage(postData);
}

function sendMessage(replyToken, replyText) {
  var postData = {
    "replyToken" : replyToken,
    "messages" : [
      {
        "type" : "text",
        "text" : replyText
      }
    ]
  };
  return postMessage(postData);
}

function sendMayBe(replyToken, mayBeWord) {
  var postData = {
    "replyToken" : replyToken,
    "messages" : [
      {
        "type" : "template",
        "altText" : "คำถามของคุณหมายความว่า่" + mayBeWord + "」แบบนี้หรือไม่?",
        "template": {
          "type": "confirm",
          "actions": [
            {
                "type":"postback",
                "label":"Yes",
                "data":"action=detail",
            },
            {
                "type": "message",
                "label": "No",
                "text": "ไม่มันไม่ใช่"
            }
          ],
          "text": "ไม่พบคำตอบ บางทีคำค้นหาคือ「" + mayBeWord + "」แบบนี้หรือไม่?"
        }

      }
    ]
  };
  return postMessage(postData);
}

function postMessage(postData) {
  var headers = {
    "Content-Type" : "application/json; charset=UTF-8",
    "Authorization" : "Bearer " + ACCESS_TOKEN
  };
  var options = {
    "method" : "POST",
    "headers" : headers,
    "payload" : JSON.stringify(postData)
  };
  return UrlFetchApp.fetch(REPLY, options);    
}

function getUserDisplayName(userId) {
  var url = 'https://api.line.me/v2/bot/profile/' + userId;
  var userProfile = UrlFetchApp.fetch(url,{
    'headers': {
      'Authorization' :  'Bearer ' + ACCESS_TOKEN,
    },
  })
  return JSON.parse(userProfile).displayName;
}

// userId
function lineUserId(userId) {
  var sheet = SpreadsheetApp.openById(SHEET_ID).getSheetByName('userId');
  sheet.appendRow([userId]);
}

// debug
function debug(text, userId) {
  var sheet = SpreadsheetApp.openById(SHEET_ID).getSheetByName('LogUserID');
  var date = new Date();
  var userName = getUserDisplayName(userId);
  sheet.appendRow([userId, userName, text, Utilities.formatDate( date, 'Asia/Bangkok', 'yyyy-MM-dd HH:mm:ss')]);
}
 

6.) เมื่อทำการ Save และ Allow Permissions เสร็จเรียบร้อยแล้ว มาลองคุยกับบอท